Saturday, 13 March 2021

Mothering Sunday

Today is actually the first time since my last blog post that I've made any cards.
It's Mother's Day on Sunday 14th March and I hadn't bought any cards. 'I'll just make them!' I told myself. I was planning to do this last weekend but got distracted by my mam suggesting I make a bunch of flowers to give to my grandma rather than real ones. It took me 2 days to get them done, in a vase and looking relatively pretty and to a standard I'm happy with to hand them over. I've made them before and blogged about them so I won't go back over all of the how I did it (note to self, look back and put here which post it was).
Here is the finished  bouquet:
So that was last weekend. Fast forward to today, I ended up going out with my mam for a couple of hours this morning, came home with more craft stuff ironically enough. Eventually sat down to start making cards for my mam, auntie and grandma. I've been looking forward to using a new die set that I got a couple of weeks ago. After a few practice cuts I was ready to start. So the dies I have used are Patchwork flowers - pansy and periwinkle.
After looking at the pictures on the packaging I settled for running 3 colours in 2 shades through my machine so I could mix and match between the shades. Pink, purple and blue.
The next part was simple - glue them down onto card. I forgot how messy it can be when you use runny glue  not a glue stick!
 I decided to add a 3rd shade to one set of cards by mounting th pieces onto coloured card rather than them all being on white. I have to say my favourites are the blue on blue card and purple on purple card, possibly because I like the flowers better but that's neither here nor there. Last thing to do to these is stamp them to give them am identity. As I'm planning to give them for Mothers Day, I have managed to find a stamp that says so, and on the card for my mam I have added a Mam stamp. I have not completed a 3rd card in this way as things are a little uncertain right now but once Ive had a call one way or another I'll know what I'm doing.

Anyways, here are the two more-or-less finished cards. I'm disappointed my quality of stamping, I tried out a new stamp mount and unfortunately I caught the edges in the ink and stamped before I noticed. I know my family won't mind but it pains me a bit to hand over marked cards.

Sunday, 22 November 2020

Christmas is Coming!!!!!!!!

 Hello!!


Okay, Christmas is coming. It's going to be strange, it's going to be different. Christmas is still happening - it has not been cancelled.

Thats been the main thought running through my head for the past two months, hopefully tomorrow we'll find out what the UK plan is for Christmas and we can all chill out a bit!

It's been bust at work and with the second lockdown (I haven't been furloughed this time!) I've had plenty to do to keep me busy - so much so that I cancelled a week off out of paranoia that I'd get furloughed after it 😂 I have however just had a long weekend as I was really starting to feel burnt out from all of the stress and pressure that I apparently never show. So my plan for this long weekend was to get those Christmas cards made.

 I sat down on Friday morning, looked at my craft materials and literally had no idea where I was going to start. I wanted to make use of some of the dies that I had bought and picked up of the Christmas magazines I've picked up over the years so I got out two of them which are very similar snow globe shapes. I just kept running them through the machine until I realised I probably cut too many out. Here are a couple of the snow globes:


There was so much glue everywhere with these... So while I had the glue out I got out some festive paper and covered the front of several smaller cards and let them dry before attaching 3D stickers to them - simple yet effective. I have a thing for stickers, especially Christmas ones. They might seem a bit like cheating to make cards but combining them in the right way, on the right background then they can look great (I think they do at least...).


So that summed up Friday, I think I came out with around 25 cards. Saturday morning brought another batch. During my Slimming World Zoom meeting I was sat in the craft room so I used that time efficiently and made up some of the decoupage packs that I still have and later attached them to cards. I made a few more before I started to wane a bit with my inspiration when I had to go do a bit of tidying for my parents coming over for dinner (they are still my support bubble so this is allowed). The last three I was quite pleased with. I had taken inspiration from an activity we're planning to do with the Brownies and Guides - make a Christmas tree shape card out of paper. I made the tree: half a large circle of green paper, fold it into 3 and fold back the outer edges so it opens like a door in the middle before cutting out snippets of paper from the side to give it a more tree like effect. I took the tree and on the middle section I stamped "Merry Christmas" and used glittery embossing powder, and on the outside I added different features for baubles to each card - pom-poms, coloured gem stickers, and red/green pearls. To make it more obvious that they were trees and not random bits of green paper stuck to a card I dug out some textured brown card to create tree trunks. 


I am posting photos of most of these creations to my Instagram. Really I should post a blog before I post the pictures but it takes seconds to post to Instagram whereas it takes a few minutes more to create a post... I'm so lazy! In theory I'll be making more cards and posting more pics as it draws closer to Christmas when I'll start posting or handing them out to family and friends. 

Christmas is the time for giving, caring and sharing with everyone. It isn't about the presents, it isn't about what you got off people or the physical value. It is about coming together, it's about family, and most importantly sharing love and kindness to all. It's been a hard year, I've been lucky in that I haven't lost anyone but at the same time so many have lost loved ones and can't spend time with the ones they love. Loneliness is hard, its worse at Christmas time and it has affected so many more people this year. So I decided that I was going to send Christmas cards to any of my contacts who wanted to receive one. Some of them are going to get one just because I have their address. I don't expect to get anything back but this is my way of saying to people - I see you, I'm thinking about you, I care about you.
 
C x

Wednesday, 23 September 2020

Sympathy card

 A couple of weeks ago I found out that a lady (G) I had worked with for 6 years had passed away. She was one of the best, an absolutely wonderful, kindhearted and caring woman, and she had been fighting cancer for over a year. It was devastating to hear that she was ill, and even more heartbreaking to find out that it was incurable. Due to the pandemic I didn't go to her funeral. I wanted to but when you are only allowed 30 people inside the Church and knowing there would be so many people outside I felt it unwise to attend. That didn't mean I wasn't thinking about her or the family she left behind.

My work colleague was going - she had known this lady longer than me and had been told she could go in for the service. I made a card which she took with her.

Now, we found out that G had requested people to wear yellow, so that was where I started with the card. I cut a rectangle of yellow paper slightly smaller than the size of the card to act as a backing. I then cut a smaller piece of white card and blended green ink across the bottom to resemble grass. I didn't want this to be an overtly sad card as G was such a bright spark in my office, I didn't use any dark colours except for the words.

While I was waiting for the green to dry, I took out two butterfly cut-outs and stuck them together down the centre to give it a 3D effect. I used Dovecrafts 3D Pearl Effects pastel colours (blue, cream, green and pink) to give the top layer butterfly some colour and pattern. Unfortunately the two that I attempted did not come out very well, luckily I had one I made several weeks ago that did not look like I had just attacked it with massive blobs of colour thinking it was pretty... I grabbed a small square of orange paper and stamped the traditional "With Sympathy" message on and used black glittery embossing powder to melp it stand out. I also grabbed my small butterfly craft punch and cut a butterfly out from beneath the words.

When the ink had dried on the card, I glued it down and began to arrange my big butterfly, message, and I pulled out some small butterflies I had cut out one day to save paper waste in pink, purple and cream. Once in position I stuck them all down and left the card blank for me to write in when I was at work and had a bit of inspiration of what to write.

I didn't take any photos during the make of this card, I did a time-lapse video which I posted on my Instagram stories. I couldn't help a little laugh when the 40 minutes it took me to make this card was shrunk down into 26 seconds! I did however take a photo of the finished product.


Sunday, 13 September 2020

Break

 Went a bit MIA again... work got busy and so did my weekends!

I've just had a week off work (back tomorrow - booo!), spent a few days away with the fam, came home and did something I haven't done since I moved in to my house - tidied and organised (sort of) the craft room!! 

I have been doing a couple of little things -

Normally I'm pretty private about what I do but then I started this blog during lockdown and after my work colleague told my she made an Instagram for her house it occurred to me that posting photos of what I've made on Instagram is not a bad thing to do - it will literally help me to remember designs I've created previously in case I want to do them again if I thought they were great. It also gives me a little bit of feedback when people hit the 'like' button. So I started that on Friday, and aside from myself, I have 6 followers. I was surprised to have any! So if you are reading this and wonder what I have made that isn't already on this blog, then please do take a look at my Instagram. It actually surprised me how much I had made (and still had record of or still have to be able to photograph) before this blog.

So as my week off has now drawn to a close, I just have to wait five more days before I get another break. I'm looking forward to that one as I don't think I really made the most of this week off...


Ta-ta for now!

Saturday, 25 July 2020

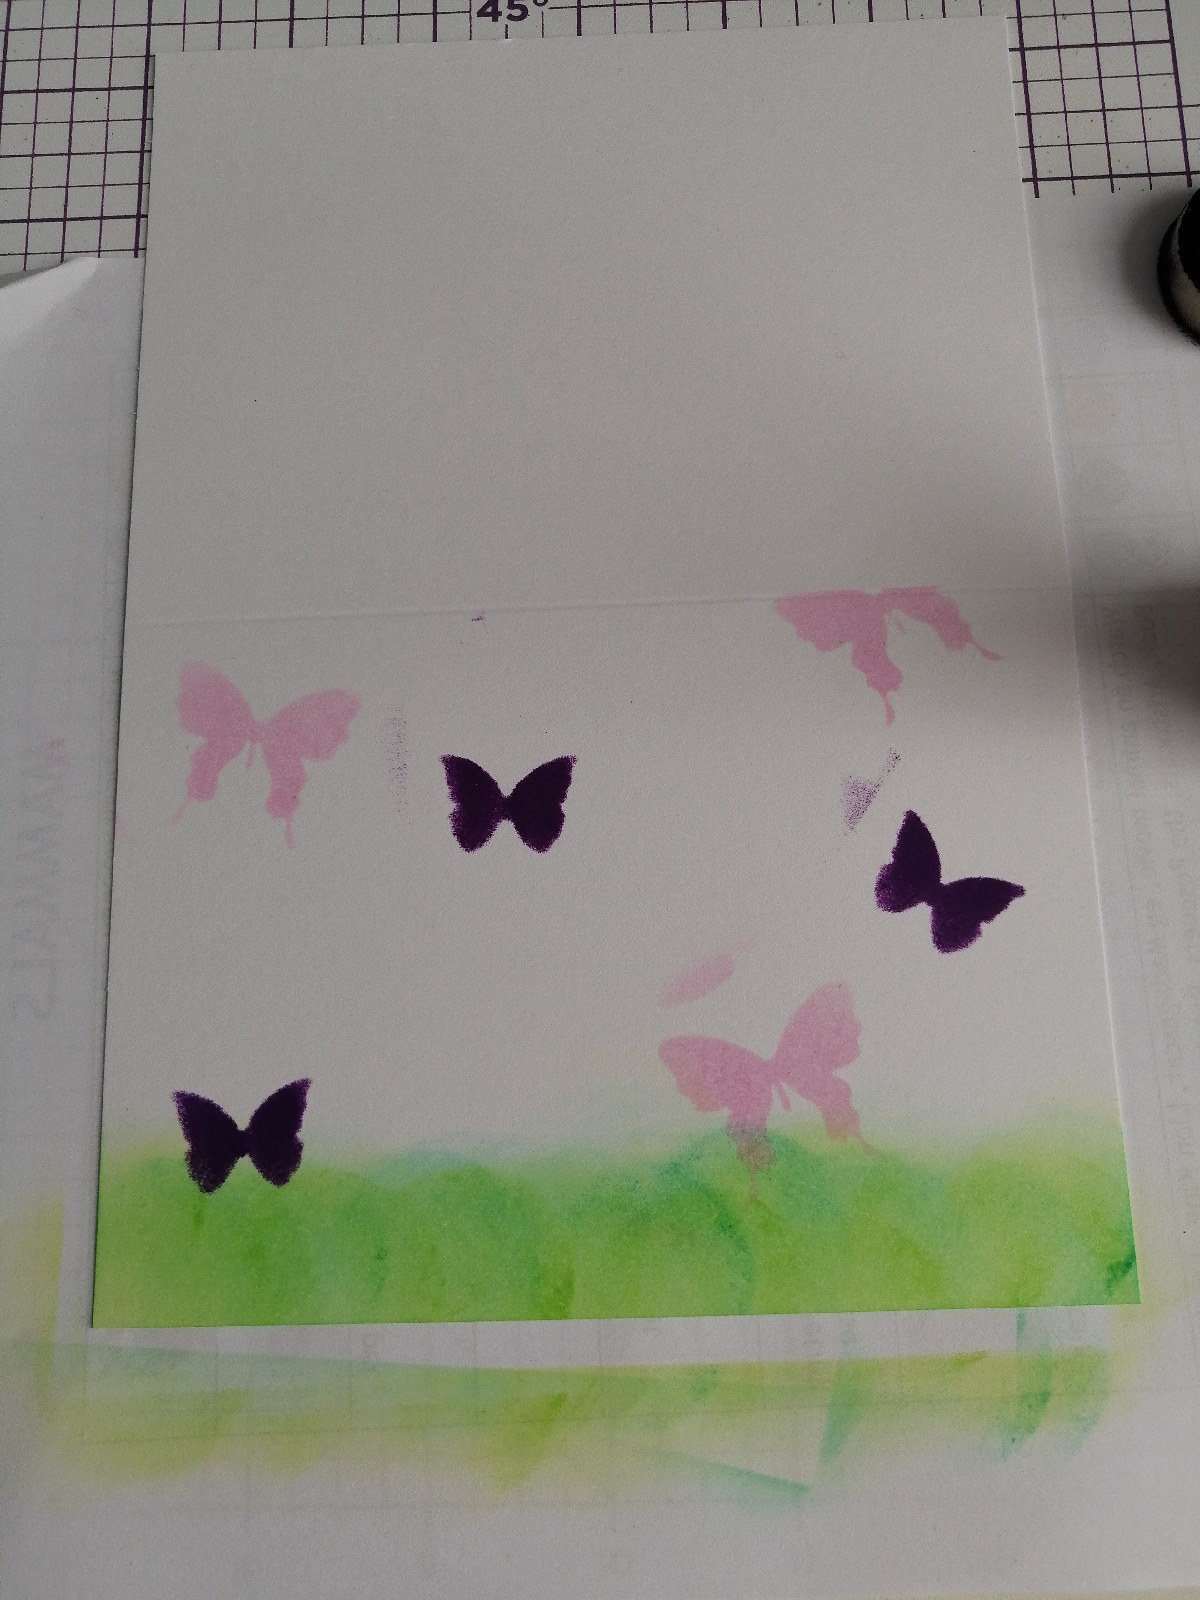
Butterflies card

I picked up my craft magazines again this afternoon and i decided to check my box of dies to see if I could try it. It's fair to say my collection of dies is quite small but I did find a couple of stencils which game me an idea - no Pinterest required this week!

I started off with a card, scrap paper, an ink blending tool and two different shades of green ink. First I put the card landscape over the scrap paper (to avoid any ink on the table!) and began by putting a layer of light green ink along the bottom, partially going off the edge of the card - I dabbed it on first to get as much ink off the sponge before rubbing along so all white space was covered. Next I took a darker green and repeated the process to layer the two shades together. This gave me a nice edge which had a grassy look to it.

Now for the stencil. I have one with multiple butterfly shapes and sizes on it so I decided to use two of these along with two more colours of ink - pink and purple. I placed the stencil in position and used the blending tool (with a fresh sponge for each colour) to apply first the purple butterflies and then the pink. I added 3 of each colour, spaced all over the card. I even have one flying off the top edge of the card, to do this I put the scrap paper along the fold so that the ink didn't spread and the edge stayed neat. Now as this is the first time I've used a proper stencil and needed to stay within the single space I didn't necessarily do a good job of that.

I was planning to put a sentiment of some kind on the card so I took one of my banner style stamps and on a thicker piece of white card, stamped the banner in black. I had planned to use another stamp for the sentiment but have found again I'm lacking in resources! Thank goodness for scrap paper and fairly neat writing. I added this to the card covering those main blotches of ink using double sided sticky dots to add a different layer to the card. I felt this didn't complete the card so I added a black die cut butterfly, also stick with the stick dots.


I will admit if I had planned this properly rather than taking my usual 'what does that look like' attitiude I would be even happier with the result - like the spacing of the butterflies, my ability to be tidy when using a stencil. As it is, I would still give it to a family member but I know for next time what I should or shouldn't do. Definitely a one I'll make again! 

Monday, 20 July 2020

Sunburst Style

I said I would post today and here I am! Little update on the family - rooms were rearranged again at my grandparents as we found out my grandma doesn't need a hospital bed or hoist and she is coming home tonight 😊

The card idea I saw and wanted to try out is a sunburst. I used scrap paper as I was just testing the design - I plan to make more of these for birthday cards and also in Christmas papers when I start making the Christmas cards!

First I picked a card, measured the outside so I could make a rough estimate for the size needed for the mounting card, the instructions I followed did give me sizes but as I was using a different size card I decided to go with my own measurements. Once trimmed to fit, this was set aside so I could focus on getting my sunburst pieces ready.

This time I followed the instructions and the pictures (the sizes on the instructions and the numbers according to the pictures! Cut out rectangles to the following sizes:

1 - 4 1/2" x 1 1/2"
1 - 4" x 1 1/2"
2 - 3" x 1 1/2"
2 - 2" x 1 1/2"


Take each rectangle and carefully cut across the diagonal so you end up with two triangles.


Get the mounting card/paper and decide where abouts you want the sunburst centre to be and begin to place the triangles around the outside covering all corners of the card. I found this part to be the most difficult part as my triangles kept moving around so I used a piece of white tack to both mark my centre and to loosely hold the points in place.


Once in position I decided to put a splodge of glue in the centre mark (replacing the white tack) so that I could have an anchor point for all of my triangles. I carefully raised each triangle, applied glue and stuck them down.You should have parts of the triangles hanging over the edge of the mount card. Simply flip this over and trim down to give straight sides.

Time to attach to the card! Cover the reverse of the mounting card in glue then gently position before applying pressure to stick the cards together. When this was stuck down, I needed to find something that would act as my centre spot. I have lots of little adhesive gemstones but these were too small, I had to dig out the bigger ones which usually require the glue gun. As this is a test card for me I used a glue stick which so far is holding pretty well!


Overall I'm please with the outcome, it's given me plenty of ideas for how I can adapt it with different colours, patterns and for different occasions. This is one idea which I will certainly be making more of in the future!

Sunday, 19 July 2020

Update

It's been a while since I posted. Almost 2 months 😓😶 This was something that I didn't want to happen! So whats been going on... Well for one thing, I went back to work on the 3rd June. Its been fairly non-stop - I was back in the store for the best part of 2 weeks before we opened to customers and we've introduced some new processes that I had to wrap my head around, and once the store opened some of the activities I/my team used to do have started to come back. I got back into the work routine no problem but trying to adjust/form a new weekend routine has been more of a problem than I anticipated. 

My plan was to make time to craft on a weekend, probably a Sunday afternoon but so far that hasn't happened. I got the card magazines out, searched through Pinterest to get some inspiration but was always dragged away either for something to do with the family, I didn't find anything I felt I could create, or I i distracted myself so much I lost track of time.

This weekend has been the family. Last Monday my grandma had a fall, she was determined that she was fine. (Just a little bit of background - my grandma has alzheimers and motor neurons disease so her memory is very spotty, she has no speech now (mainly noises), and her mobility has decreased over the past few months - she's had a few falls including one only a week or so before this one where she had to go to A&E as the cut on her head was pretty deep luckily it didn't need stitches but a plaster was put on so she knew that something had happened.) Long store short she wasn't fine and has been in hospital since Tuesday. My parents, my auntie and myself have spent pretty much the whole weekend with my grandad preparing his house so that we can get my grandma home. The dining room was turned into living room #2, the living room was rearranged to become a half living room, half bedroom - my grandma is going to be getting a hospital bed and a hoist for support getting in and out, and my grandad now has a single bed which we brought downstairs so he can sleep in the same room with her. Its been a hard weekend, my grandad has been so strong about the whole situation and it's been hard to hear him on the phone to my grandma/the nurses looking after her trying not to show how upset he is but we can tell how much its breaking his heart being away from her.

With any luck the hospital bed will arrive tomorrow and my grandma can go home.

On the flip side, I finally found a card design I wanted to test out, I did that just before writing this post so I will upload the photos and write about it tomorrow!